Particle Trails Background Effect for Divi Fullwidth Header Module
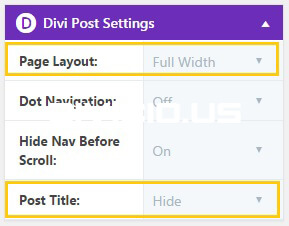
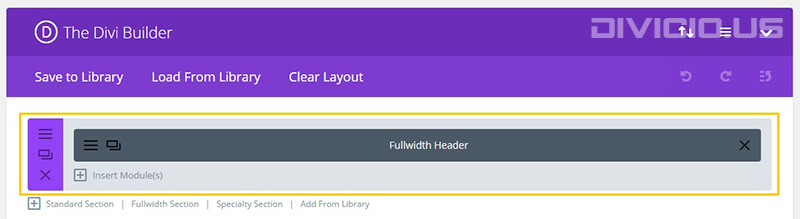
After you enable the Page Builder for your post go to Divi Post Settings and set the page layout to “Full Width” and post title to “Hide”, then add the Fullwidth Header module in a fullwidth section with padding set to 0.
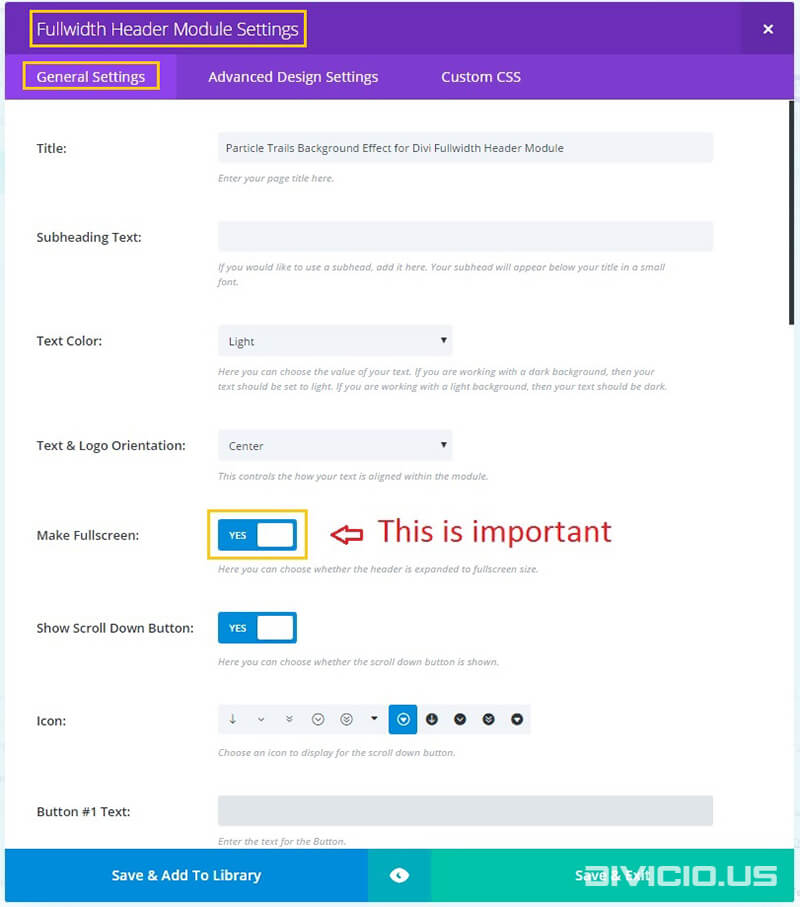
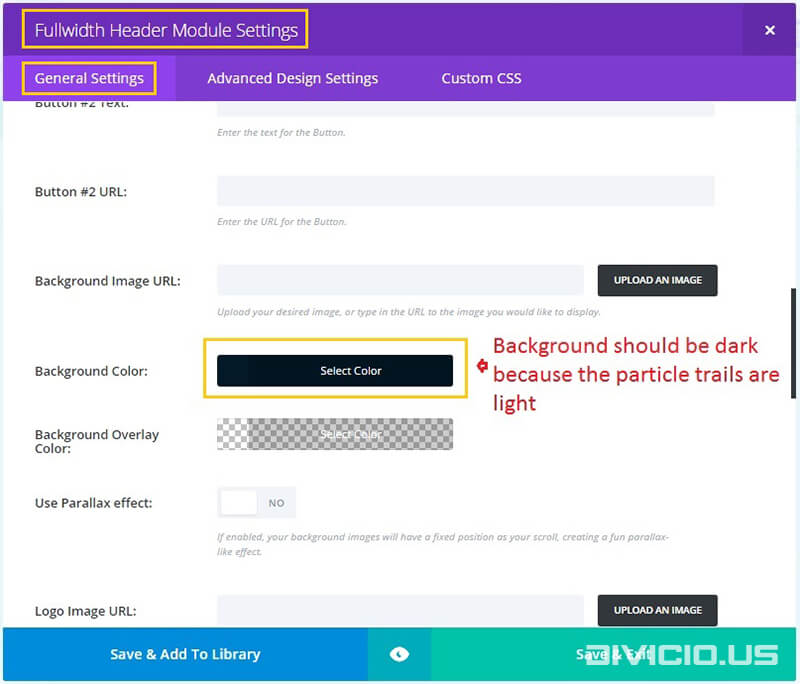
Apply following Fullwidth Header Module settings.
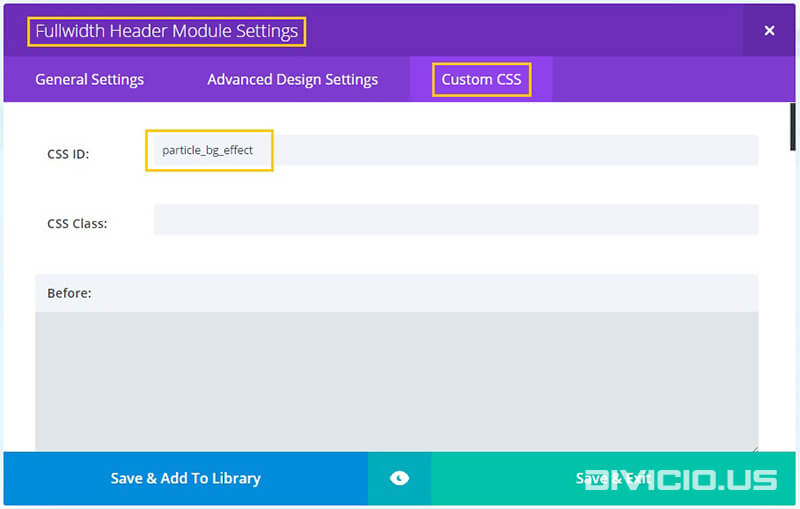
Add the particle_bg_effect id to Fullwidth Header Module Settings -> Custom CSS -> CSS ID field like it is shown in the screenshot below. If you already have an id assigned to the Fullwidth Header module then you shouldn’t add another one since an element is supposed to have only one id, in this case you will have to find the particle_bg_effect id in the Javascript and CSS code snippets below and replace every instance of it with your id.
This is the JS code snippet for the particle trails background effect. You can set the number of particles, particle speed, particle color and size of circle (see highlighted rows in the code below).
<script type="text/javascript">
/*  Particle Trails Background Effect  */
(function($) {

'use strict';

/* ---- CORE ---- */
var canvas = document.createElement('canvas');
var context = canvas.getContext('2d');
var windowWidth = canvas.width = window.innerWidth;
var windowHeight = canvas.height = window.innerHeight;
canvas.id = 'canvas';
document.getElementById('particle_bg_effect').insertBefore(canvas, document.getElementById('particle_bg_effect').firstChild);
/* ---- CORE END ---- */
/* ---- CREATING ZONE ---- */

/* ---- SETTINGS ---- */
var numberParticlesStart = 250; /* set particles number here */
var particleSpeed = 0.2; /* set particle speed here */
var velocity = 0.9;
var circleWidth;

 /* ---- RESPONSIVE CIRCLE SIZE ---- */
if ( $( window ).width() > 980 ) {
    circleWidth = 300; /* set circle width for desktop here */
} else if ( $( window ).width() < 981 && $( window ).width() > 479 ) {
        circleWidth = 200; /* set circle width for tablet here */
    } else {
            circleWidth = 150; /* set circle width for phone here */
        }

/* ---- INIT ---- */
var particles = [];

var getRandomFloat = function getRandomFloat(min, max) {
  return Math.random() * (max - min) + min;
};

/* ---- Particle ---- */
function Particle(x, y) {
  this.x = x;
  this.y = y;

  this.vel = {
    x: getRandomFloat(-20, 20) / 100,
    y: getRandomFloat(-20, 20) / 100,
    min: getRandomFloat(2, 10),
    max: getRandomFloat(10, 100) / 10
  };

  this.color = 'rgba(255, 205, 15, 0.05)'; /* set particle color here */
}
Particle.prototype.render = function () {
  context.beginPath();
  context.fillStyle = this.color;
  context.arc(this.x, this.y, 1, 0, Math.PI * 2);
  context.fill();
};
Particle.prototype.update = function () {

  var forceDirection = {
    x: getRandomFloat(-1, 1),
    y: getRandomFloat(-1, 1)
  };

  if (Math.abs(this.vel.x + forceDirection.x) < this.vel.max) {
    this.vel.x += forceDirection.x;
  }
  if (Math.abs(this.vel.y + forceDirection.y) < this.vel.max) {
    this.vel.y += forceDirection.y;
  }

  this.x += this.vel.x * particleSpeed;
  this.y += this.vel.y * particleSpeed;

  if (Math.abs(this.vel.x) > this.vel.min) {
    this.vel.x *= velocity;
  }
  if (Math.abs(this.vel.y) > this.vel.min) {
    this.vel.y *= velocity;
  }

  this.testBorder();
};
Particle.prototype.testBorder = function () {
  if (this.x > windowWidth) {
    this.setPosition(this.x, 'x');
  } else if (this.x < 0) {
    this.setPosition(windowWidth, 'x');
  }
  if (this.y > windowHeight) {
    this.setPosition(this.y, 'y');
  } else if (this.y < 0) {
    this.setPosition(windowHeight, 'y');
  }
};
Particle.prototype.setPosition = function (pos, coor) {
  if (coor === 'x') {
    this.x = pos;
  } else if (coor === 'y') {
    this.y = pos;
  }
};

/* ---- Functions ----*/
function loop() {
  var i = undefined;
  var length = particles.length;
  for (i = 0; i < length; i++) {
    particles[i].update();
    particles[i].render();
  }
  requestAnimationFrame(loop);
}

/* ---- START ---- */
function init() {
  var i = undefined;
  for (i = 0; i < numberParticlesStart; i++) {
    var angle = Math.random() * 360;
    particles.push(new Particle(windowWidth * 0.5 + Math.cos(angle) * circleWidth, windowHeight * 0.5 - Math.sin(angle) * circleWidth));
  }
}
init();
window.onresize = function () {
  windowWidth = canvas.width = window.innerWidth;
  windowHeight = canvas.height = window.innerHeight;
  particles = [];
  context.clearRect(0, 0, windowWidth, windowHeight);
  init();
};

window.addEventListener('click', function () {
  particles = [];
  context.clearRect(0, 0, windowWidth, windowHeight);
  init();
});

loop();

})(jQuery);

</script>If you want the particle animation to not to run continuously but stop at some point then replace the code inbetween the lines 105 – 139 (inclusive) of the JS provided above with this JS code below (note the highlighted line 15 – that’s where you can set the particle animation timeout in milliseconds):
/* ---- Functions ----*/
var pause = false;
function loop() {
 let i;
 const length = particles.length;
 for (i = 0; i < length; i++) {
 particles[i].update();
 particles[i].render();
 }
if(pause) return;
 requestAnimationFrame(loop);
}
// stop animation after a set amount of time
function pause_the_loop() {
setTimeout( () => pause = true, 2000); /* set animation duration here (in ms) */
}

/* ---- START ---- */
function init() {
 var i = undefined;
 for (i = 0; i < numberParticlesStart; i++) {
 var angle = Math.random() * 360;
 particles.push(new Particle(windowWidth * 0.5 + Math.cos(angle) * circleWidth, windowHeight * 0.5 - Math.sin(angle) * circleWidth));
 }
}
init();
window.onresize = function () {
 windowWidth = canvas.width = window.innerWidth;
 windowHeight = canvas.height = window.innerHeight;
 particles = [];
 context.clearRect(0, 0, windowWidth, windowHeight);
 init();
};

window.addEventListener('click', () => {
 pause = false;
 particles = [];
 context.clearRect(0,0, windowWidth, windowHeight);
 init();
 loop();
 pause_the_loop();
});

loop();
pause_the_loop();
The canvas positioning needs to be adjusted so that it doesn’t push the Fullwidth Header contents down and doesn’t create horizontal scrollbar, for this we’ll use the following CSS code:
/* Particle Trails Background Effect */

#particle_bg_effect canvas#canvas {
    position: absolute;
    left: 0px;
}
@media all and (min-width: 1025px) {
    #particle_bg_effect canvas#canvas {
        left: -20px;
    }
}

/* End Particle Trails Background Effect */
Inspired by: #Codevember day 8 _ Particle Trails
is there a way to make the effect stop once it gets to a certain point instead of continuing to spread. I like how it starts and would like to make it stop once it gets to the full circle before it starts spreading out.
Hi Amit,
yes, it is possible to do that and one of the ways would be by using the
setTimeout()function which will stop the particle animation after a specified period of time. To implement that replace the /* — Functions — */ part with the following code:/* ---- Functions ----*/
var pause = false;
function loop() {
let i;
const length = particles.length;
for (i = 0; i < length; i++) { particles[i].update(); particles[i].render(); } if(pause) return; requestAnimationFrame(loop); }
function pause_the_loop() {
setTimeout( () => pause = true, 2000);
}
And then replace the
window.addEventListenercode (including theloop()function call at the very end) at the bottom with this code:window.addEventListener('click', () => {
pause = false;
particles = [];
context.clearRect(0,0, windowWidth, windowHeight);
init();
loop();
pause_the_loop();
});
loop();
pause_the_loop();
You can change the time period in the
pause_the_loopfunction, I’ve set it to 2s (2000 ms).Hope this helps.
I changed the code as you mentioned but can’t seem to get it to work. This is what I have for the code
/* Particle Trails Background Effect */
(function($) {
‘use strict’;
/* —- CORE —- */
var canvas = document.createElement(‘canvas’);
var context = canvas.getContext(‘2d’);
var windowWidth = canvas.width = window.innerWidth;
var windowHeight = canvas.height = window.innerHeight;
canvas.id = ‘canvas’;
document.getElementById(‘particle_bg_effect’).insertBefore(canvas, document.getElementById(‘particle_bg_effect’).firstChild);
/* —- CORE END —- */
/* —- CREATING ZONE —- */
/* —- SETTINGS —- */
var numberParticlesStart = 250; /* set particles number here */
var particleSpeed = 0.2; /* set particle speed here */
var velocity = 0.9;
var circleWidth;
/* —- RESPONSIVE CIRCLE SIZE —- */
if ( $( window ).width() > 980 ) {
circleWidth = 300; /* set circle width for desktop here */
} else if ( $( window ).width() 479 ) {
circleWidth = 200; /* set circle width for tablet here */
} else {
circleWidth = 150; /* set circle width for phone here */
}
/* —- INIT —- */
var particles = [];
var getRandomFloat = function getRandomFloat(min, max) {
return Math.random() * (max – min) + min;
};
/* —- Particle —- */
function Particle(x, y) {
this.x = x;
this.y = y;
this.vel = {
x: getRandomFloat(-20, 20) / 100,
y: getRandomFloat(-20, 20) / 100,
min: getRandomFloat(2, 10),
max: getRandomFloat(10, 100) / 10
};
this.color = ‘rgba(255, 205, 15, 0.05)’; /* set particle color here */
}
Particle.prototype.render = function () {
context.beginPath();
context.fillStyle = this.color;
context.arc(this.x, this.y, 1, 0, Math.PI * 2);
context.fill();
};
Particle.prototype.update = function () {
var forceDirection = {
x: getRandomFloat(-1, 1),
y: getRandomFloat(-1, 1)
};
if (Math.abs(this.vel.x + forceDirection.x) < this.vel.max) {
this.vel.x += forceDirection.x;
}
if (Math.abs(this.vel.y + forceDirection.y) this.vel.min) {
this.vel.x *= velocity;
}
if (Math.abs(this.vel.y) > this.vel.min) {
this.vel.y *= velocity;
}
this.testBorder();
};
Particle.prototype.testBorder = function () {
if (this.x > windowWidth) {
this.setPosition(this.x, ‘x’);
} else if (this.x windowHeight) {
this.setPosition(this.y, ‘y’);
} else if (this.y < 0) {
this.setPosition(windowHeight, 'y');
}
};
Particle.prototype.setPosition = function (pos, coor) {
if (coor === 'x') {
this.x = pos;
} else if (coor === 'y') {
this.y = pos;
}
};
/* —- Functions —-*/
var pause = false;
function loop() {
let i;
const length = particles.length;
for (i = 0; i pause = true, 2000);
}
/* —- START —- */
function init() {
var i = undefined;
for (i = 0; i {
pause = false;
particles = [];
context.clearRect(0,0, windowWidth, windowHeight);
init();
loop();
pause_the_loop();
})(jQuery);
Not sure if I missed something
Thanks
Yes, you missed a part of code and that’s why it’s not working. I’ve updated the post with implementation of your requested feature, please check it above.
Thank you, It works great
how can i use https://vincentgarreau.com/particles.js/ js from this site in your coding ?
HI IVAN,
I was wondering if you had a Divi tutorial for a particle header like this one. https://hatchapps.com/
It cycles by also interacts with the mouse-over and click
Hi Elizabeth.
No, unfortunately I haven’t done one yet but have you seen this tutorial? Might be what you are looking for.
if i change the color of the particles, the particles become thicker, why is that? i had to leave the same color as the tutorial
Hi Alex. Sorry for late reply, have been very busy these days. Use alpha color and try to keep transparency as low as possible, the lower it is the thinner is the particle trail.
Wow this is so cool.
Is it possible to combine this with a typewriter text effect to the title too(https://css-tricks.com/snippets/css/typewriter-effect/)?
Can i put it above menu,so when i add a button under the text and the button scroll the page down,the menu shows? Like this (https://endure.com.au/)
Sorry for the questions and the links.
Hi Chris.
I think it would be easier to integrate it with the CSS-only version of the Typewriter effect, but JS versions should be fine too.
Divi has the “Hide Nav Before Scroll” option, you can enable/disable it in the page settings. Clicking the button on page header scrolls the page to anchor and while the page is scrolling the menu slides down. This is exactly what is implemented on the page that you are providing (https://endure.com.au/). You simply need to implement the particle trails effect for the page header background and the rest can be done using Divi core features.
Hope this helps.
Thank you very much!
Wonder if there is a way to utilize this such that the final ‘shape’ is something specific (logo from svg coordinates? icons?)
Seems like a really tricky-cool way to add interest/intrigue for the right kind of website…maybe even combining with semi-transparent image over or below the particle effect…
Anyhow, just thoughts. Thanks for sharing, Ivan.
Good idea with the final shape, might involve some work but would be nice to give it a try.
awesome, you’re the man! I have a question, where do i change the background color and particle trail color? is it possible?
Thank you Alex. Sure, you can change the background color in the Fullwidth Header Module settings, I marked it in one of the images above, and the particle color can be changed on line numer 51 of the JS code, this is one of the highlighted lines which indicate where you can change the effect settings.
i see, thanks a lot Ivan, i can’t wait to use it in a project! :)
Hi Ivan,
Amazing tutorial! really cool!
I was wondering if there is a way to inject the jquery code into a normal page so you can use it in the fullwidth header but also on a page instead of a post.
Thanks for your amazing contribution!
Hi Thomas.
Thank you for your comment. It doesn’t matter where you use the Fullwidth Header – on a post or a page – this effect will work in both cases.
This is unreal. Soooo cool!
Couldn’t help but notice the menu on the demo page. Can I ask what you used for that?
Two things I hadn’t seen before. Love when that happens. :)
Hi Corey, thanks for your comment. I have a tutorial about how to apply those dropdown menu animations too, here it is: 10 Dropdown Animations for Divi Submenu. Check out my other tutorials too, maybe you’ll find some more cool stuff there. ;)
You are awesome. Thank you!
Good Stuff!
Nice one Ivan – as Pedro said – good tutorial.Thanks
Thanks mate!
Very good tutorial, detailed and concise, thanks and regards.
Glad you like this tutorial :) Thank you for your kind words, I really appreciate that.