How To Add Borders To Divi Menu Items
by Ivan Chiurcci | Aug 10, 2023 | 0 comments
In this tutorial you’ll learn how to add borders to Divi menu items the right way. This is a really simple solution, though it’s not that straight forward as it might seem to be at first.
We’ll be adding borders to the main menu items of the Divi theme Default, Centered and Centered Inline Logo header styles desktop menus, as well as the menus created using Divi Menu and Fullwidth Menu modules.
And, additionally, you will learn how to add borders to Divi MadMenu menu items. This is the easiest solution since it does not require any custom CSS but simply tweaking the module design settings.
Contents
Demo
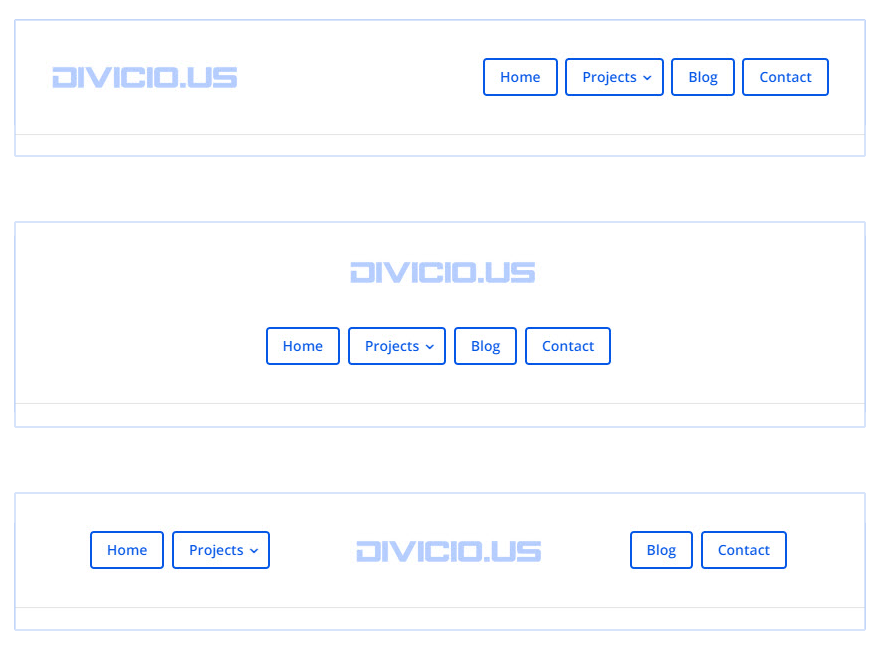
Here is the preview of Divi theme Default, Centered and Centered Inline Logo header styles:
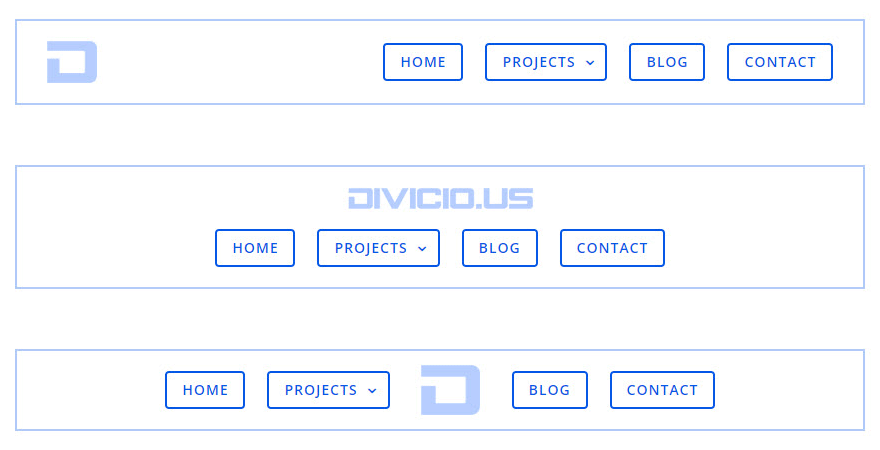
And this is the preview of Divi Menu module Left Aligned, Centered and Inline Centered Logo header layout styles:
Add borders to Divi menu items of the Default, Centered and Centered Inline Logo header styles
First let’s add borders to Divi menu items of the Default, Centered and Centered Inline Logo header styles.
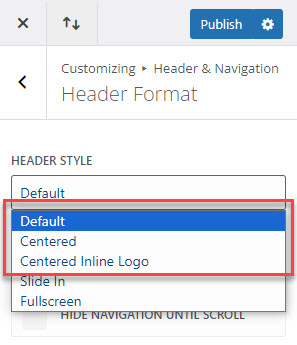
To do that all we need is the following CSS:
/* menu item link */
.et_header_style_left #et-top-navigation nav > ul > li > a,
.et_header_style_centered #et-top-navigation nav > ul > li > a,
.et_header_style_split #et-top-navigation nav > ul > li > a {
  border: 2px solid #0758e6;
}
This CSS adds the borders to desktop main menu items, however, due to the structure of the Divi menu and it’s items the result is not exactly what we need:
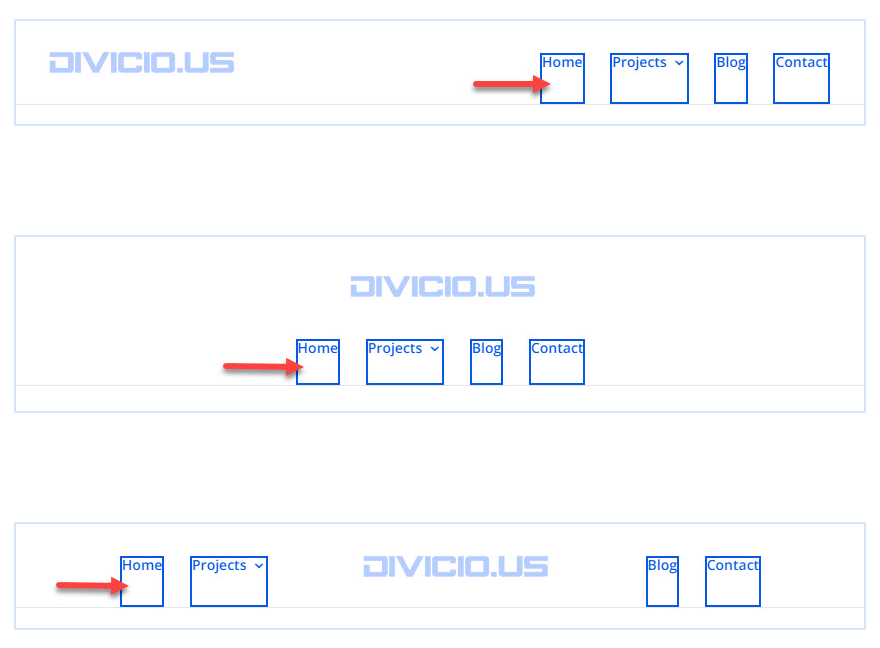
As you can see, adding just borders is not enough, we also need to adjust menu items spacing to give the items button shapes, something similar to this:
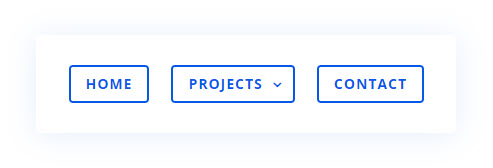
To achieve that we need to decrease the menu items bottom padding and add padding to top, left and right sides as well.
Then we need to adjust the menu container bottom padding so that there is equal spacing above and below the menu elements (both for normal and fixed headers).
Here is the CSS that applies all the adjustments for all three header styles:
/**
 * Add borders to Divi main menu items.
 * Works for Divi theme Default, Centered and Centered Inline Logo
 * header styles.
 *
 * @author Ivan Chiurcci
 * @site   https://divicio.us
 */
@media all and (min-width: 981px){
  /* navigation container */
  .et_header_style_left #et-top-navigation,
  .et_header_style_centered #et-top-navigation,
  .et_header_style_split #et-top-navigation {
      display: flex;
      align-items: stretch;
  }

  .et_header_style_centered #et-top-navigation,
  .et_header_style_split #et-top-navigation {
      justify-content: center;
  }

  .et_header_style_left #et-top-navigation,
  .et_header_style_centered #et-top-navigation,
  .et_header_style_split #et-top-navigation {
      padding-bottom: 33px;
  }

  /* menu item */
  .et_header_style_left #top-menu > li,
  .et_header_style_centered #top-menu > li,
  .et_header_style_split #top-menu > li {
      padding-right: 4px;
      margin: 5px 0;
  }

  /* menu item link */
  .et_header_style_left #et-top-navigation nav > ul > li > a,
  .et_header_style_centered #et-top-navigation nav > ul > li > a,
  .et_header_style_split #et-top-navigation nav > ul > li > a {
      border: 2px solid #0758e6;
      border-radius: 4px;
      padding: 10px 15px;
  }

  /* parent menu item link */
  .et_header_style_left #et-top-navigation #top-menu > .menu-item-has-children > a,
  .et_header_style_centered #et-top-navigation #top-menu > .menu-item-has-children > a,
  .et_header_style_split #et-top-navigation #top-menu > .menu-item-has-children > a {
      padding-right: 25px;
  }

  /* parent menu item arrow icon */
  .et_header_style_left #et-top-navigation #top-menu > .menu-item-has-children > a:after,
  .et_header_style_centered #et-top-navigation #top-menu > .menu-item-has-children > a:after,
  .et_header_style_split #et-top-navigation #top-menu > .menu-item-has-children > a:after {
      right: 7px;
      top: 10px;
  }

  /* cart icon */
  .et_header_style_left #et-top-navigation .et-cart-info,
  .et_header_style_centered #et-top-navigation .et-cart-info,
  .et_header_style_split #et-top-navigation .et-cart-info {
      display: flex;
      align-items: center;
  }

  /* search icon */
  .et_header_style_left #et_top_search,
  .et_header_style_centered #et_top_search,
  .et_header_style_split #et_top_search {
      display: flex !important;
      align-items: center;
  }

  .et_header_style_left #et_search_icon:before,
  .et_header_style_centered #et_search_icon:before,
  .et_header_style_split #et_search_icon:before {
      position: relative;
  }

  .et_header_style_centered #et_search_icon:before {
      top: 0px;
  }

  /* fixed header navigation container */
  .et_header_style_left .et-fixed-header #et-top-navigation,
  .et_header_style_centered .et-fixed-header #et-top-navigation,
  .et_header_style_split .et-fixed-header #et-top-navigation {
      padding-bottom: 20px;
  }

  /* fixed header menu item link */
  .et_header_style_left .et-fixed-header #et-top-navigation nav > ul > li > a,
  .et_header_style_centered .et-fixed-header #et-top-navigation nav > ul > li > a,
  .et_header_style_split .et-fixed-header #et-top-navigation nav > ul > li > a {
      padding-bottom: 10px;
  }
}
Add the CSS above into the Divi -> Theme Options -> General -> General -> Custom CSS field.
Add borders to Divi menu items of the Menu and Fullwidth Menu module
Now, let’s add borders to menu items of Divi menus created using the menu modules for all available header styles.
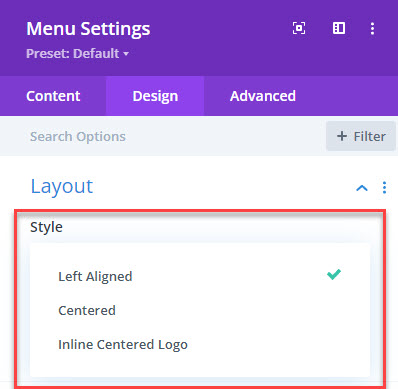
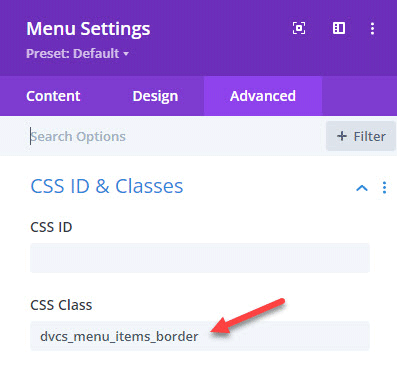
First, we need to add a CSS class to the module in Menu Settings -> Advanced -> CSS ID & Classes -> CSS Class.
For this tutorial I used the dvcs_menu_items_border CSS class but you can use any other class you want, just make sure to replace the dvcs_menu_items_border class in the custom CSS selectors with your CSS class.
Similarly, we can add borders to menu items of the menus created using Divi Menu or Fullwidth Menu module using this simple CSS:
/* menu item link */
.dvcs_menu_items_border.et_pb_fullwidth_menu--with-logo .et_pb_menu__menu > nav > ul > li > a,
.dvcs_menu_items_border.et_pb_fullwidth_menu--without-logo .et_pb_menu__menu > nav > ul > li > a,
.dvcs_menu_items_border .et_pb_menu__menu > nav > ul > li > a,
.dvcs_menu_items_border.et_pb_menu--with-logo .et_pb_menu__menu > nav > ul > li > a {
    border: 2px solid #0758e6;
}
However, the initial result is again not what we need:
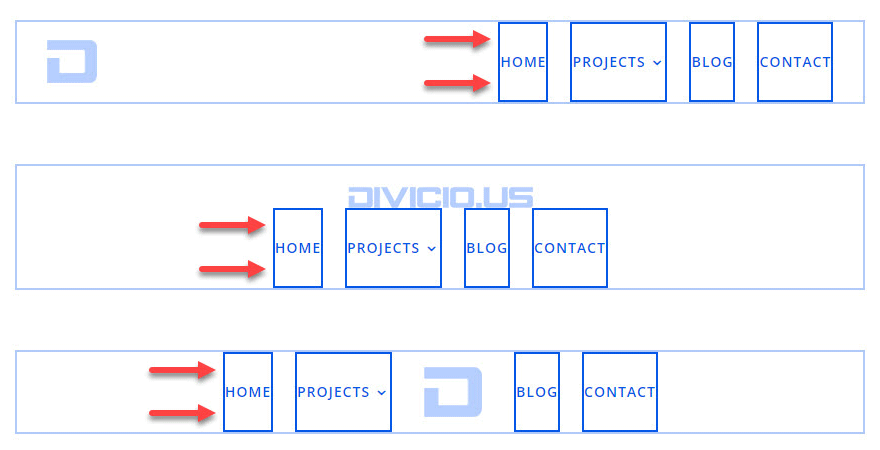
So, we need to adjust the spacing for the menu items and the menu container similarly to what we did for the Default, Centered and Centered Inline Logo header styles above.
Here is the complete CSS for that:
/**
 * Add borders to main menu items for
 * Divi Menu and Fullwidth Menu modules desktop menus.
 *
 * @author Ivan Chiurcci
 * @site   https://divicio.us
 *
 */
/* menu items container */
.dvcs_menu_items_border.et_pb_menu .et_pb_menu__menu > nav > ul,
.dvcs_menu_items_border.et_pb_fullwidth_menu .et_pb_menu__menu > nav > ul,
.dvcs_menu_items_border.et_pb_fullwidth_menu--without-logo .et_pb_menu__menu > nav > ul {
  align-items: center;
  padding-top: 0 !important;
}

.dvcs_menu_items_border.et_pb_menu .et-menu-nav > ul ul {
    padding: 20px 0 !important;
}

.dvcs_menu_items_border.et_pb_menu .et_pb_menu__menu > nav > ul > li > ul {
    left: 10px;
}

/* menu item */
.dvcs_menu_items_border.et_pb_fullwidth_menu--without-logo .et_pb_menu__menu > nav > ul > li,
.dvcs_menu_items_border.et_pb_menu--without-logo .et_pb_menu__menu > nav > ul > li,
.dvcs_menu_items_border .et_pb_menu__menu > nav > ul > li {
  margin-top: 0;
}

/* menu item link */
.dvcs_menu_items_border.et_pb_fullwidth_menu--with-logo .et_pb_menu__menu > nav > ul > li > a,
.dvcs_menu_items_border.et_pb_fullwidth_menu--without-logo .et_pb_menu__menu > nav > ul > li > a,
.dvcs_menu_items_border .et_pb_menu__menu > nav > ul > li > a,
.dvcs_menu_items_border.et_pb_menu--with-logo .et_pb_menu__menu > nav > ul > li > a {
    padding: 10px 15px;
    border: 2px solid #0758e6;
    border-radius: 4px;
}

/* parent menu item */
.dvcs_menu_items_border .et-menu > .menu-item-has-children > a:first-child {
    padding-right: 30px;
}

/* fix parent menu item arrow alignment */
.dvcs_menu_items_border .et-menu > .menu-item-has-children > a:first-child:after {
    right: 7px;
}

.et_pb_menu--without-logo .et_pb_menu__menu > nav > ul > li > a:after {
    top: 50%!important;
    transform: translateY(-50%);
}

.dvcs_menu_items_border.et_pb_menu--style-centered .et_pb_menu__wrap {
    margin-top: 20px;
}
You can add this CSS into the Divi -> Theme Options -> General -> General -> Custom CSS field to apply it globally, or add it to your header template using a Code module so that this CSS loads only on the pages which your header template has been assigned to.
Add borders to Divi MadMenu menu items
Adding borders to menu items of the menus created using Divi MadMenu is the easiest and most flexible solution. You don’t need any custom CSS, just tweak the menu items design settings.
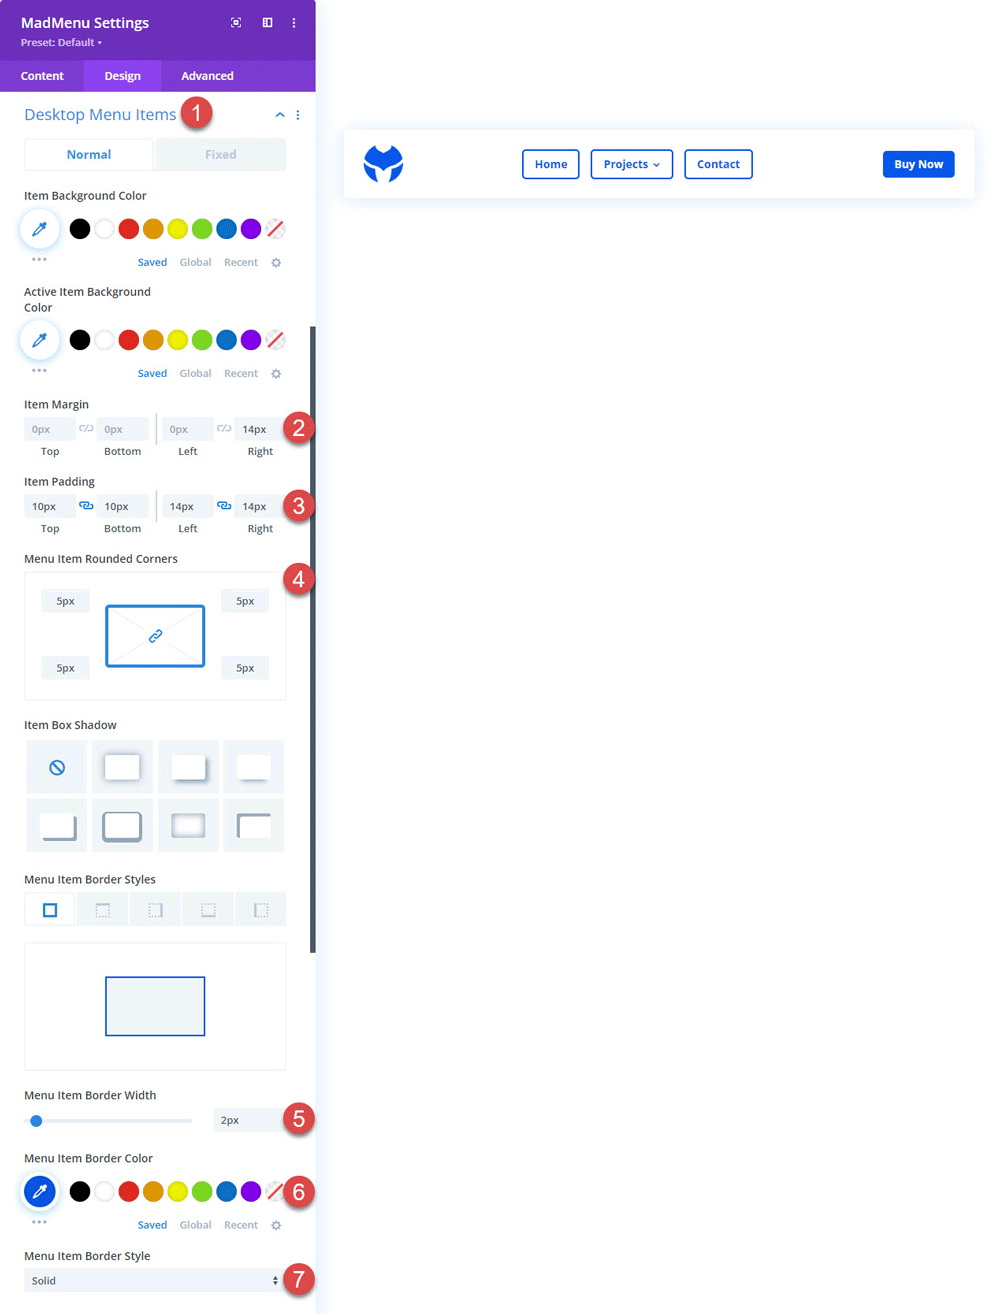
Divi MadMenu allows styling the menu items for both the desktop and mobile menus (both main and submenu items).
And you can easily do the same with the MadMenu Vertical Menu module menu items as well.
Final Thoughts
This tutorial shows how you can add borders to Divi menu items using two different methods: custom CSS and Divi MadMenu extension.
Use the CSS method if you are using one of the Divi theme headers styles, or if you’ve created your website menus using Divi menu modules.
And if you want much more flexibility without the need to deal with custom code then consider using the Divi MadMenu extension.
Hope you find this tutorial helpful. If you have any thoughts and suggestions let’s discuss them in the comments section below.
View Live Demos & Get Divi MadMenu
Download Divi Freebies!
Join our mailing list to receive exclusive FREE file downloads, news and updates right in your inbox.
Please confirm your email address to complete your subscription. Thank you!
Unsubscribe at any moment. No spam, ever!

